Multi-factor authentication is a two-step verification method that adds an extra layer of protection by making sure that you, and only you, are the person signing into your work account. All employees and students are already using MFA to log in to university systems.
To add the Microsoft authenticator to your account, start by logging into any of our platforms that use the Microsoft single sign-on, such as Canvas or Self Service. Enter your username and password as usual.


Please note: You may be prompted to authenticate using your previous method of authentication (such as a text message or voice call) during this process.
You will receive a prompt to better protect your account by downloading the Microsoft Authenticator app.

You’ll need to select Next on the prompt, which will take you through the Authenticator app setup.

Using your smart phone, navigate to your device’s app store and search for “Microsoft Authenticator.” Make sure you select the correct application.

The Microsoft authenticator icon is a blue, heart shaped lock with a person on it.

Once the app has downloaded, click next on your computer screen. You will be prompted to set up your account in the authenticator app.

Open the authenticator application on your cell phone. The following series of prompts will appear (in any order) throughout the setup:
- Allow notifications? This is a requirement. The app will send a notification to your phone each time you have to authenticate. Select Allow.
- We respect your privacy. We gather non-personally identifiable usage data… This is a requirement for the app to sync with your NU account. Select Accept or OK.
- Help us improve Authenticator. This is optional. To allow, check the box. To not allow, click continue without checking the box.
- Please note: Since the authenticator app is a secure application, you will be prompted to enter your devices security key (including facial recognition, device pin, security pattern, fingerprint, etc.) several times throughout the set-up process and when using the application.
Click the link to add a work or school account. Keep in mind each phone’s interface might look slightly different. What you see on your cell phone application might look slightly different from the screenshots below.

Click next on your computer screen.

The easiest way to connect your account is with the QR code on the next screen on your computer such as this example below.

Select add account by QR code. You may be prompted to allow the authenticator app to access your camera. Click allow if prompted. Use the app to scan the QR code on your computer screen. Allow the account to be added to your cell phone application. This might take a few seconds. Once you see that your account has been added, click next on your computer screen.

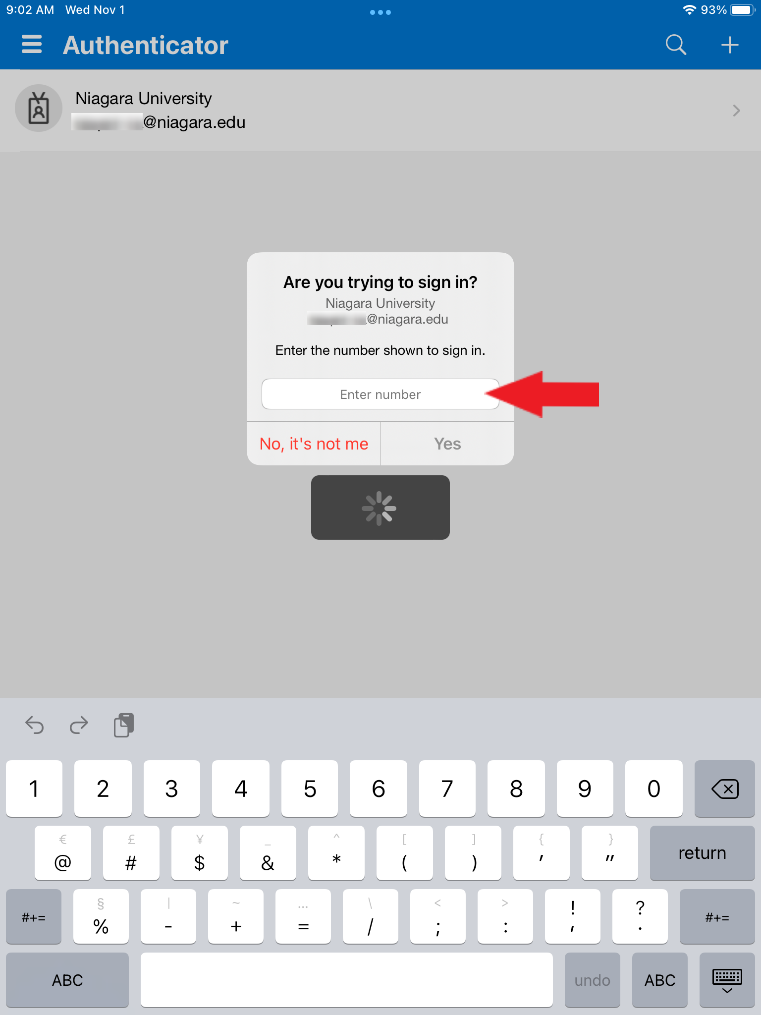
The next screen on your computer will display a two-digit code.

A notification will pop up on your cell phone. Please enter the two-digit code on your computer screen into the notification box on your cell phone and click Yes or press enter. If the notification box does not immediately appear, navigate to your device’s notifications.
|

Allow the application a few seconds to sync with your account. Once the notification has been approved, your computer will display the message below. Click next.

Your computer screen will display the following notification alerting you that your default sign-in method has been updated to the Microsoft Authenticator app. Click Done.

Was this article helpful?
That’s Great!
Thank you for your feedback
Sorry! We couldn't be helpful
Thank you for your feedback
Feedback sent
We appreciate your effort and will try to fix the article